The true power of Facebook advertising rests almost entirely within its audience building function. By giving access to a vast amount of data, you can create and target a highly specific, customized group of users that are the most likely to respond to your messaging (in fact, if you don’t take advantage of all Facebook has to offer with audience building, then there’s a good chance your Facebook ads will fail).
However, over the past few months, Facebook has changed A LOT about how you can build target audiences. So we’re going to give you a brief overview on how to navigate the options and dashboards.
But First, Your Pixel
The Facebook Pixel is still as important as ever, as it has a lot to do with how you build your audiences in the first place.
If you’re unaware, the Facebook pixel is just a snippet of code that is inserted into code of your website.
How to install your pixel
Installing your pixel is a pretty straightforward process. Start by clicking the menu in the top left of your ads manager dashboard and choosing “Pixels”.
![]()
From there, you’ll be taken to the pixel set up screen. Click Set Up Pixel
![]()
Next, you’ll be given a pop-up with the pixel code in it. If you’re HTML-savvy, you can follow the instructions and implement it yourself. You can also integrate your pixel with Google Tag Manger.
However, if coding isn’t your thing, the pop-up gives you the option to email the installation instructions to your website developer as well. Just choose the option that works best for you, follow the instructions, and you’ll be good to go!
![]()
Once installed and active, the pixel page should look like this.![]()
Building Your Audiences
Now that your pixel is installed, you have a wide range of options for creating new target audiences.
To get started, simply click the menu in the top left again and choose the “Audiences” option under “Assets”.

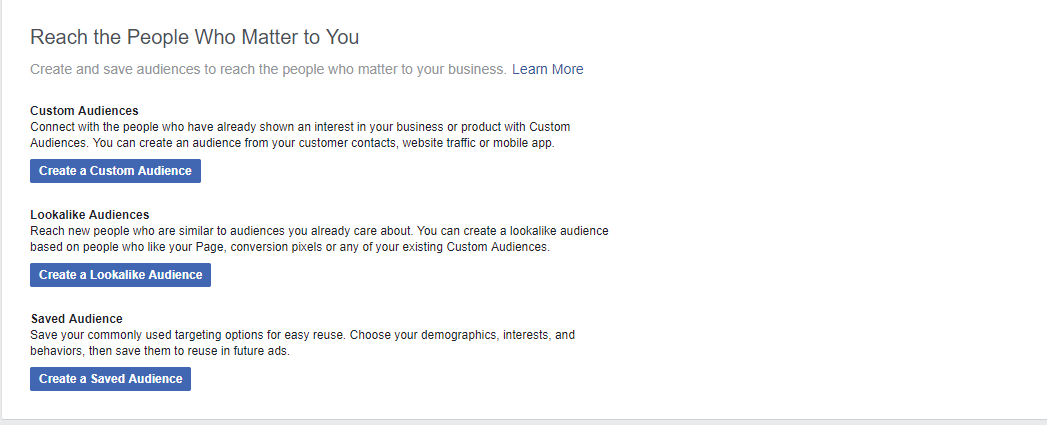
From there, you’ll be taken to your asset library, where you can pick from three different audience building options: Custom Audiences, Lookalike Audiences, & Saved Audiences. (Once you create audiences, you can access them from the same page)

We’re going to start with the basic “Saved Audience” option, which is the process of manually creating a target audience based off data from four key areas:
- Interests – Anything someone shows interest in by liking a particular Facebook page
- Demographics – A wide range of data that includes age, sex, location, relationship, family size, religion, political affiliation, income, and more. (Update: You can no longer target by job title, education, or field of study. To read the article on why, just follow this link)
- Behaviors – Based on how people interact online. Ex: purchase behaviors.
- Connections – People who like your page, their friends, or people who don’t like your page.
All of this data comes either directly from Facebook (data submitted by users on their own profiles) or major, outside data gathering sources.
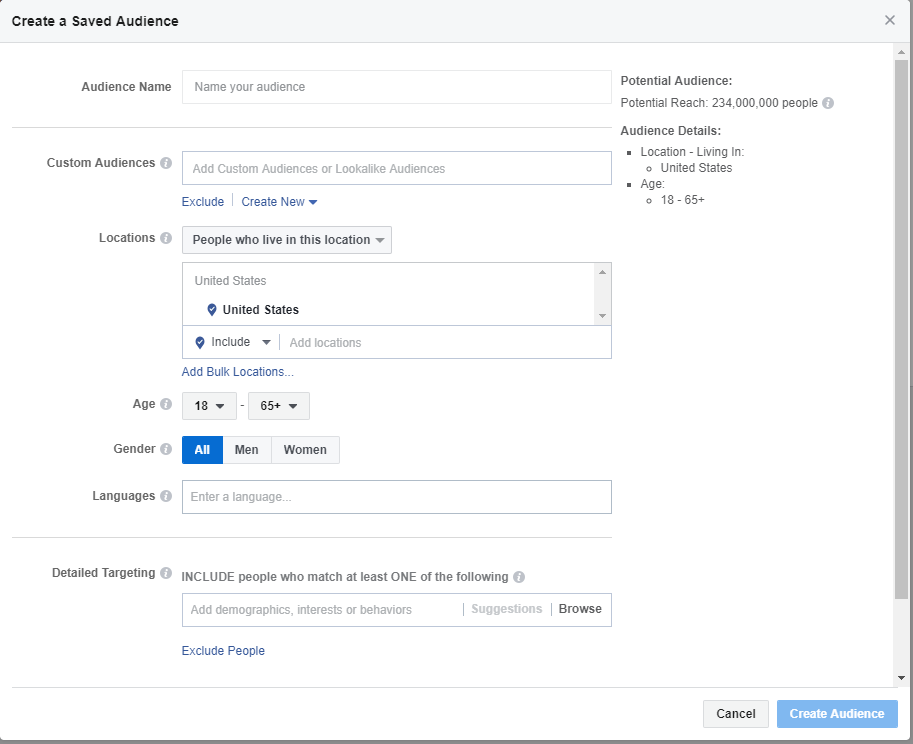
When you click on “Create a Saved Audience”, you’ll be taken to this screen:

As you can see, the left side of the screen is where you pick your targeting information, and the right side lets you see your audience make up and how many people you can expect to reach.
The mechanics of it all are pretty straight forward (pick your data, click save), but there are some really important strategic points you should consider building an audience this way:
1: Be as specific as possible
If you’re familiar with our content, then you know that we’re huge about Hyper-personalization. Rather than creating one large audience, break it down into smaller subsets and deploy different, personalized messages to each one. As we pointed out above, the Demographics option let you get *extremely* specific. So take advantage of this and go beyond the broad age, sex, & location targeting.
2: Consider personal experience and stereotypes.
There is a “stereotypical” target for every product or service (i.e. if you sell women’s shoes, you target women). But in your own personal business experience, you may notice trends that outside of your average stereotypical customer. When building an audience, consider both of these things. Don’t always defer to the stereotype.
3: Target the consumer and the influencer
In relation to the last point, you don’t just have to target the consumer. Target the person who influences the consumer (parent, spouse, etc). Keep in mind that most of us tend to value the opinions of our friends, family, and other users over an actual company. And since Facebook makes sharing a post or ad so easy, you can leverage other users influence in your favor.
Lastly, give your audience a name. Then click Create Audience. It will be saved to your asset library and you’ll be able to immediately start running ads to it!
Creating Custom & Lookalike Audiences
Aside from the Saved Audience option, you can also create audiences using two other methods: Custom Audiences and Lookalike Audiences.
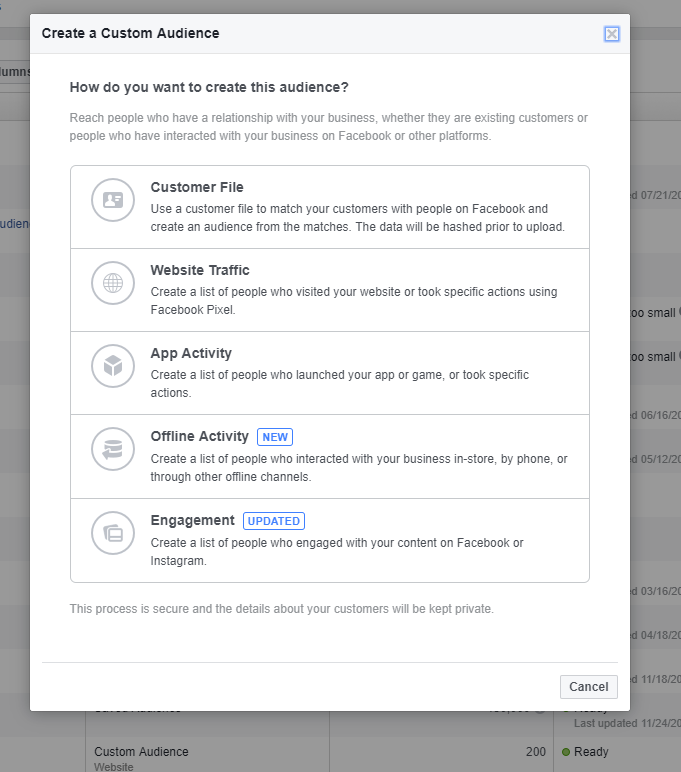
Custom Audiences are automatically generated based off of a number of criteria you can choose from. If you click the Create a Custom Audience option, you’ll be taken to this pop up:

Currently there are 5 options for creating a Custom Audience:
- Customer File – Upload a customer files, such as your email list, directly to Facebook, and then create an audience to target from those matches. This can be very valuable combined with a solid email campaign.
- Website Traffic – Using the pixel, you can build an audience based off of peole who visit your website, or certain pages on your website. Example: You could build an audinece based on everyone who visited a particular product page on your site, but didn’t buy. Then, you could retarget that audience to push them through the funnel. Keep in mind, you can (and should) create multiple different audiences to traffic visits to different pages on your website, allowing you to target and retarget multiple audiences at once.
- App Activity – If your business has an app that’s been integrated with Facebook, you can build an audience of people who have interacted with your app in some way.
- Offline Activity – A way to build an audience of people who have interacted with your business by another means, such as in-store, through phone, or another offline channel.
- Engagement – Build an audience based off of people who have engaged with your page content or specific ads. Example: You could build an audience of people who interacted with a certain ad, and then retarget them with a different ad.
Once you build your custom audience, it saves into the asset library, where you can then run ads to the audience or create a lookalike audience.
Lookalike Audiences are another type of automatically generated audience that builds itself based on the demographic info of the people in a custom audience or who like your Facebook page (note, you cannot create Lookalike Audiences for Saved Audiences).
So say, for example, that you have a Custom Audience built around all the people who filled out the form on a Facebook lead ad. You could create a Lookalike Audience that will find other people on Facebook who match the same user data as the people in your Custom Audience. This allows you to target new people with the same tastes and interests, or who exhibit similar behavior, as those in your Custom Audience. It’s a great option for reaching new customers that you haven’t connected with yet.
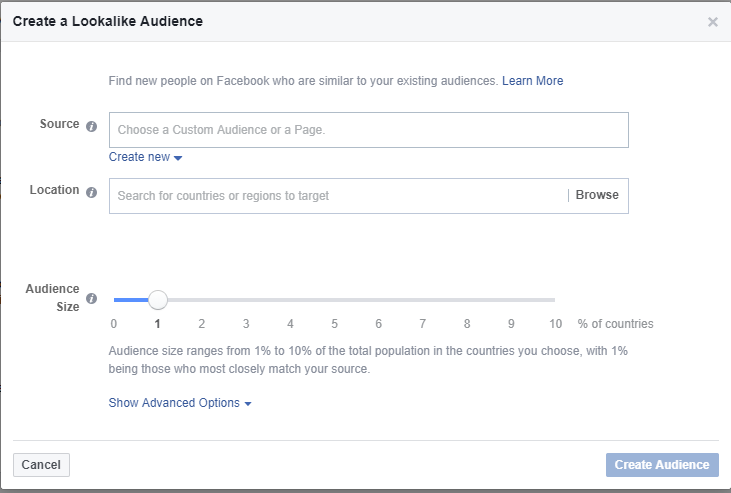
If you want to create a Lookalike Audience, simply choose “Create a Lookalike Audience” on the audience page, which will bring you to this popup:

Simply pick the source (your page or the Custom Audience) you want to base your Audince off of, the location, and then choose the audience size. Once you’ve filled in all the criteria, just click “Create Audience”.
So that’s the basic rundown of creating audiences on Facebook. If you found this article helpful, share it with a friend. At the same time, if we left any questions unanswered, let us know in the comments or email us at social@widenetconsulting.com


