Zoho Mail Setup
Step 1 – Find your unique CNAME Once you’ve signed up with Zoho, you’ll need to verify that you own the domain name by adding records to your domain. Note: When you first sign up for Zoho, you’ll follow a

Step 1 – Find your unique CNAME Once you’ve signed up with Zoho, you’ll need to verify that you own the domain name by adding records to your domain. Note: When you first sign up for Zoho, you’ll follow a
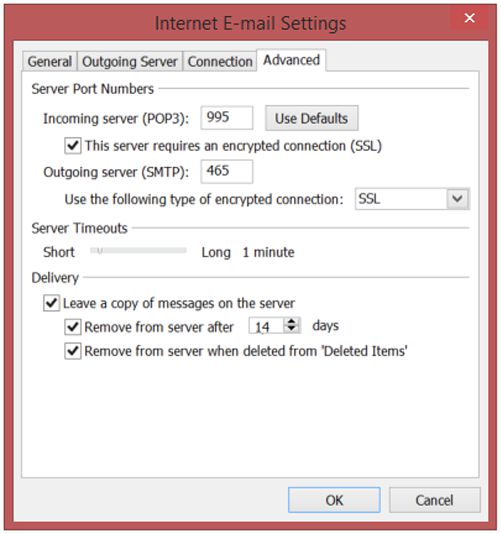
Open Outlook, click the TOOLS menu, and select EMAIL ACCOUNTS Choose the appropriate situation: If you’re adding an email account to this Outlook click NEW… and click Next. Check the box next to MANUALLY CONFIGURE SERVER SETTINGS OR ADDITIONAL SERVER
Open Outlook, click the TOOLS menu, and select EMAIL ACCOUNTS Choose the appropriate situation: If you’re adding an email account to this Outlook click NEW… and click Next. Check the box next to MANUALLY CONFIGURE SERVER SETTINGS OR ADDITIONAL SERVER

To set up Windows Mail for IMAP, perform the following steps: In Windows Mail, click Tools > Accounts. Click Add. Click Next. Enter your first and last name. This is the name that will appear in the From field of
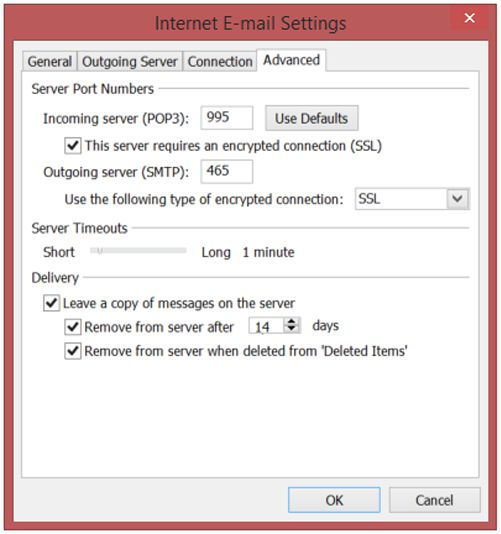
Open Outlook, click the TOOLS menu, and select EMAIL ACCOUNTS Choose the appropriate situation: If you’re adding an email account to this Outlook select ADD A NEW EMAIL ACCOUNT and click Next. Choose POP3 as your server type and click
If You’re Using Outlook: First Log into your webmail on a web browser Right-click on Trash & click Purge “Trash” Click on the dropdown menu next to your email address & click Settings Click on General Settings > Email Options